Shoplazza Compliance Modification
Any cross-border e-commerce independent site needs to make corresponding compliance adjustments to the website to ensure that the website complies with the [Cross-border Payment Website Compliance Requirements] in the network maintenance documents (please ensure that the content is consistent when entering the website from mobile devices as it is on the PC side).
Before You Start
Please contact the Oceanpayment Operations Team to obtain the Website Modification Advice document.
Please contact the Oceanpayment Business Team to obtain operational support.
Card Icon Compliance Modification
Major card organizations, banks, and other institutions require cooperating merchants to add their payment method icons to the website. This section will introduce how to add the corresponding payment icons in the store constructed by Shoplazza. Oceanpayment provides merchants with a variety of payment icons.
1. Enable Icon Display at the Bottom of the Page
Enable the display of secure payment icons at the bottom of the theme page. Please refer to the Shoplazza official documentation - Enable Secure Payment Icons.
2. Add Icons through the App
You need to install an app. Please refer to the Shoplazza official documentation - Install Payment Icon App.
Add More Logos, before adding, please confirm that the Payment Icon App has been installed and can be displayed normally.
- Download the required icons from the Oceanpayment Material Library
- Upload the icons to the Shoplazza Material Center (Shoplazza admin -> Settings -> Material Center)
- Copy the link of the icon.
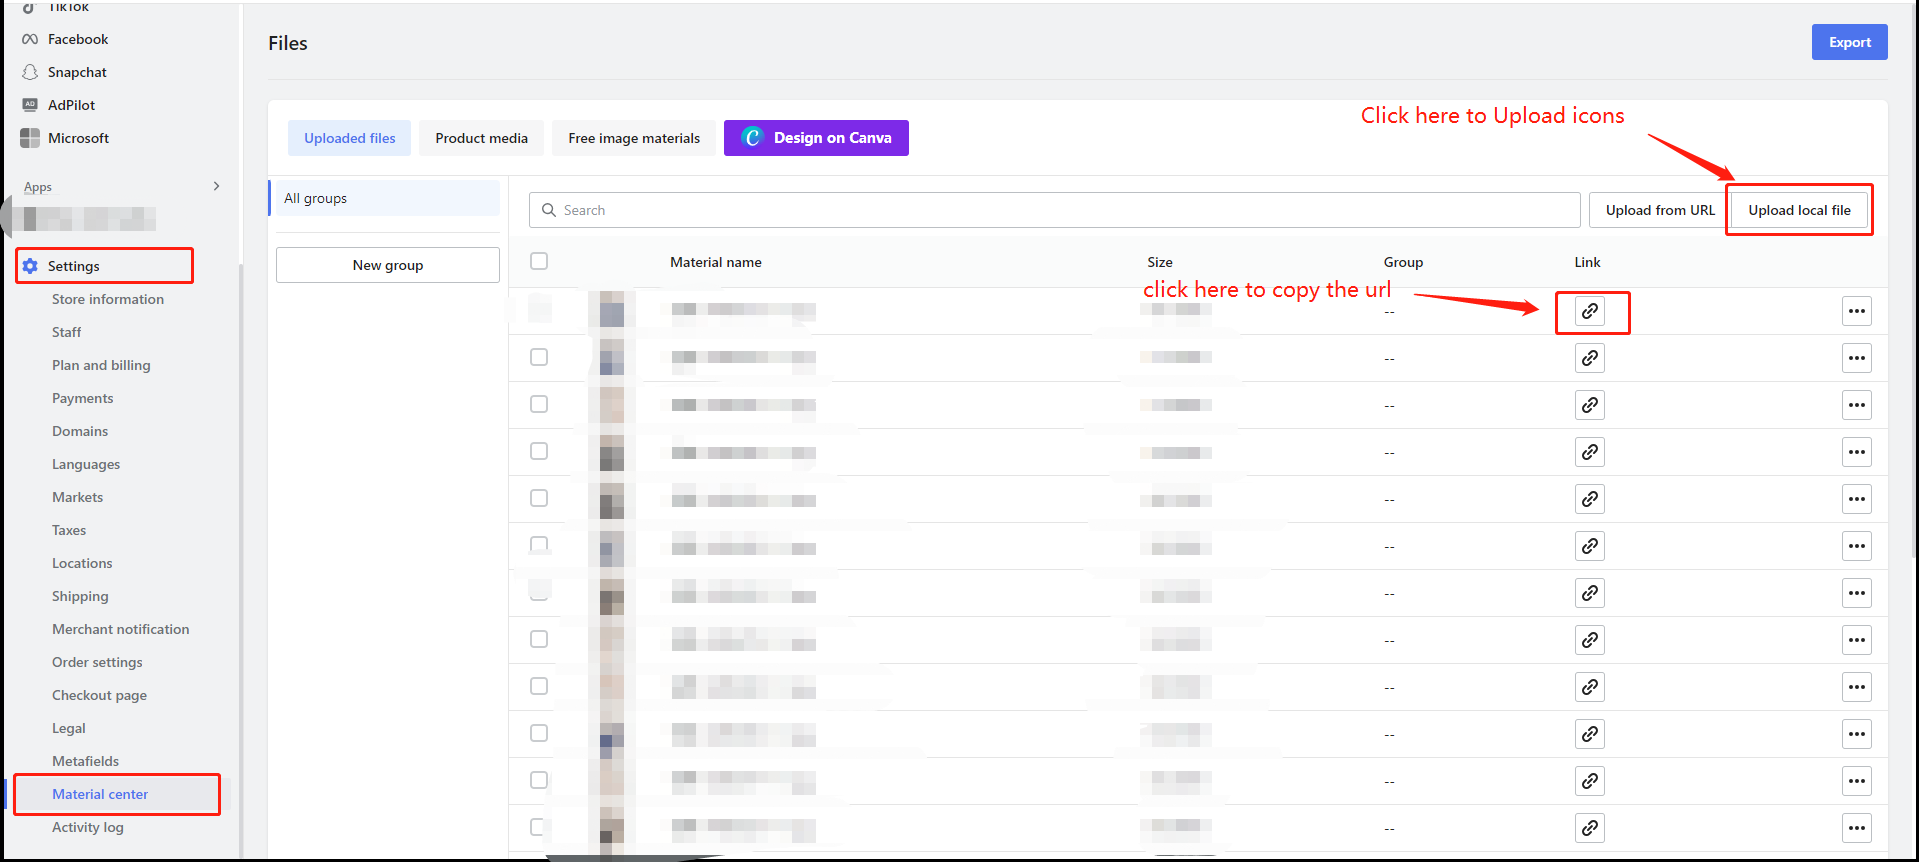
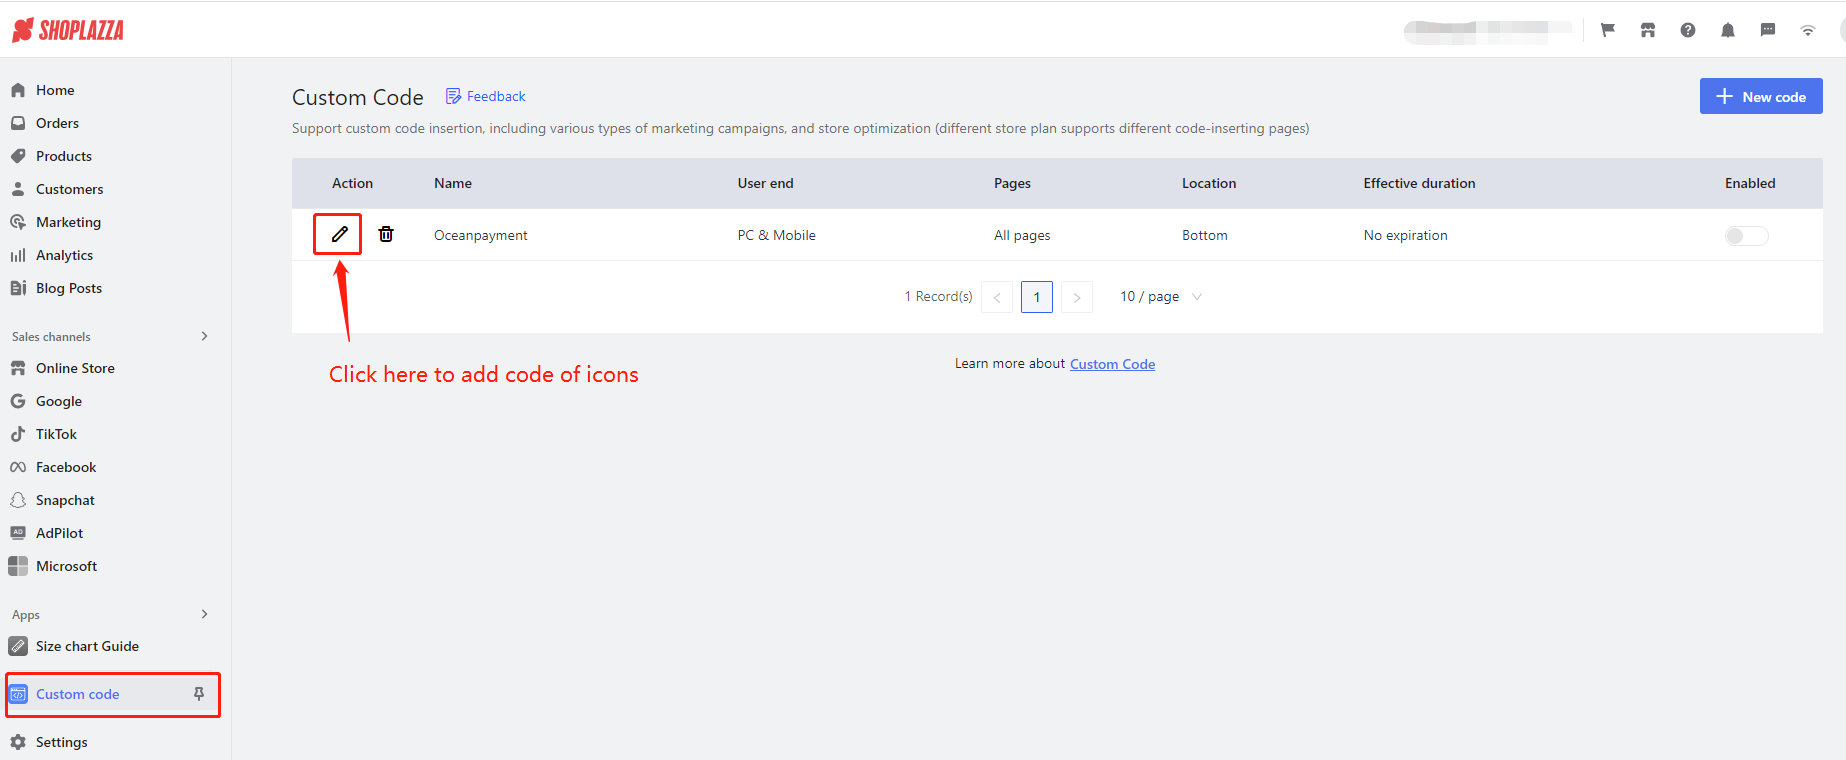
- Open the Custom Code Embedding APP in the Shoplazza backend (Shoplazza backend -> Apps -> Custom Code Embedding -> Select the icon code being displayed and click Edit Icon)
- Prepare a new img tag, and replace the link in the src with the link of the just-uploaded image.
img tag example
<img style="height:24px;margin:4px;" src="The link copied in step 3, insert here">- Copy the code prepared in the previous step to the position indicated by the arrow in the following figure.
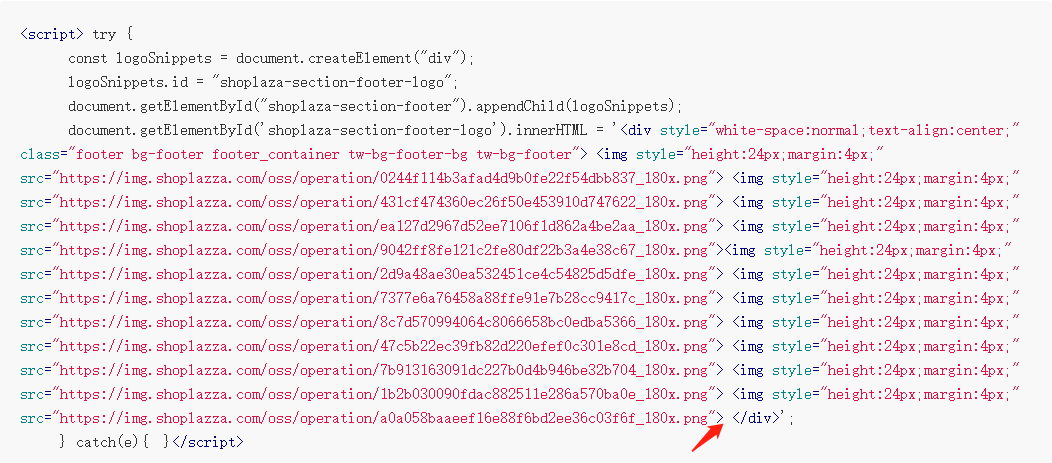
- Example after addition:
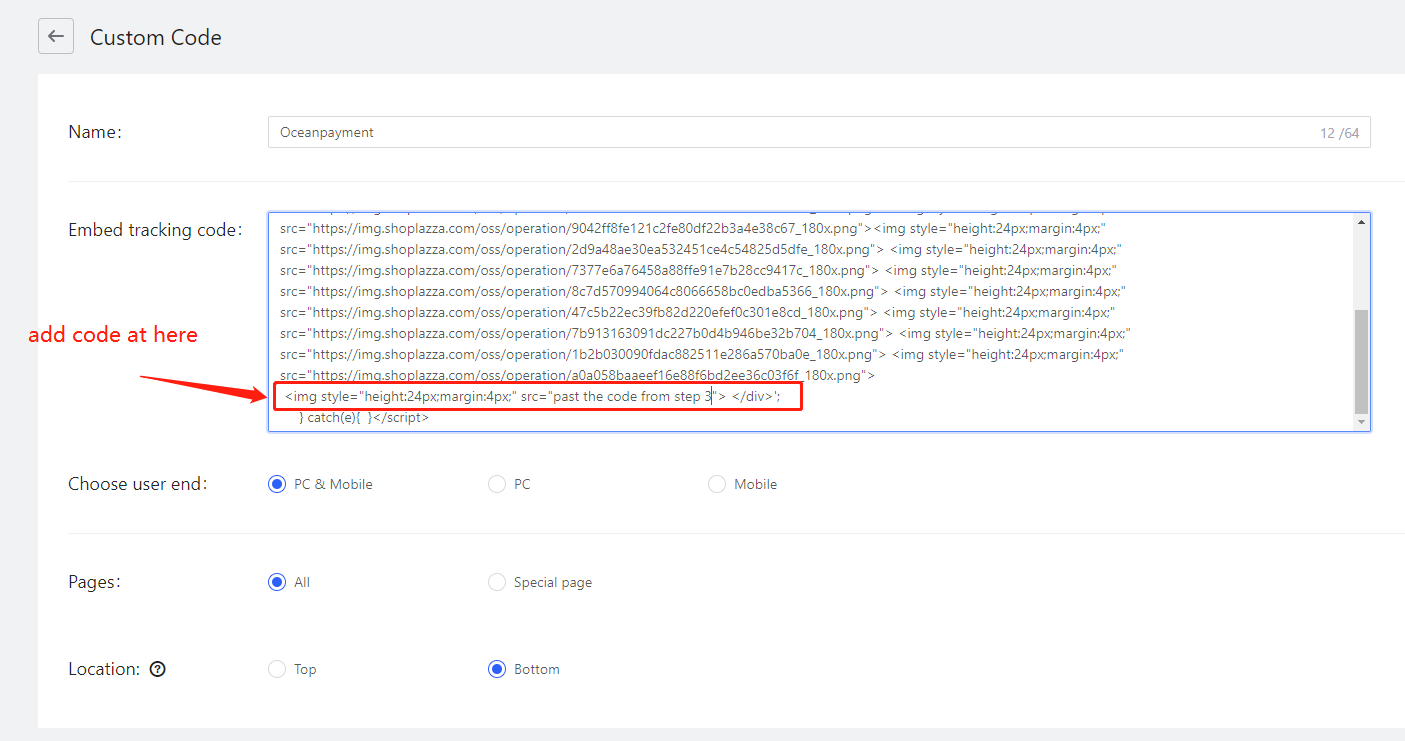
- Click Save
Common Issues
1. After the App is installed and the code is added, the icon is not displayed on the page.
Two pieces of code are provided in the App installation document, and different themes adapt to different codes, which can be replaced in the Custom Code Embedding App.
Website Terms Modification
This step requires adding the corresponding terms to a separate page, and the link to this term usually needs to be placed in the footer at the bottom of the webpage. The Oceanpayment Operations Team will provide the corresponding content of the terms. Each item must be displayed on a separate page, and you need to create a page in the custom page and then place it in the footer menu.
1. Create a Footer Menu & Add Page Links
The footer menu is located at the bottom of the page, and the footer menu will be displayed at the bottom of all pages. The footer menu can link to other pages related to the store, for example: Add titles such as the store's refund policy in the footer menu and link to the corresponding custom page, and consumers can click to jump and display related information. The footer section can help consumers quickly obtain store information, which helps consumers build trust in the store and greatly improve the user experience.
1.1 Build a Footer Menu
Please refer to the Shoplazza official documentation to add a footer menu, Build a Footer Menu.
The following terms must be added (and as separate pages), please contact Oceanpayment Operations Support to obtain the following document templates.
- Contact Us
- Shipping Policy
- Return Policy
- About Us
- Terms & Conditions
- Intellectual Property Rights
- Privacy Policy
1.2 Add Treaty Content
Paste the template provided by the Oceanpayment Operations staff into the text box on the corresponding independent page.
2. Terms & Conditions
2.1 Add Main Body Code
Different payment methods of banks have different requirements for the main body displayed on the website. Adding the main body code is a way to manage the main body displayed on the website. After adding, it can be adjusted according to the bank's requirements.
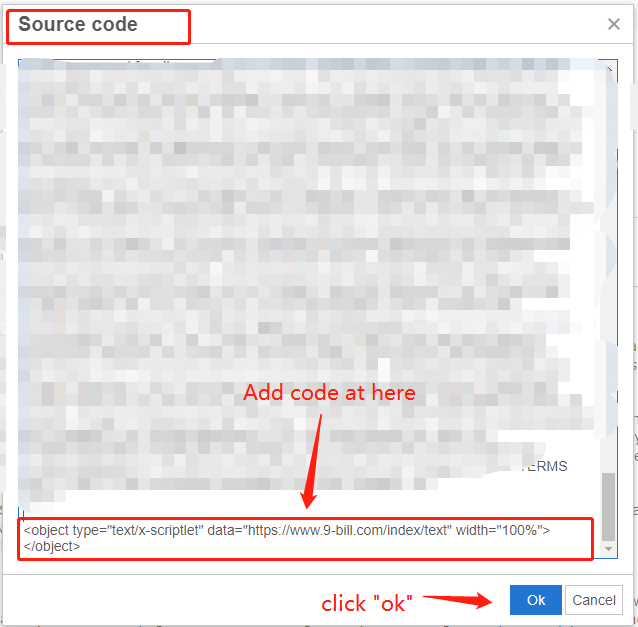
Merchants need to insert the following code at the bottom in the editor's code mode.
Main Body Code:
Add a clause link with an image:
<img src="https://www.9-bill.com/index/img"> Or a clause link with text:
<object type="text/x-scriptlet" data="https://www.9-bill.com/index/text" width="100%"></object>(Choose one of the links, the specific type of link to be added should be based on the Website Modification Advice document provided by Oceanpayment.)
Addition Steps
- Log in to the Shoplazza backend -> Sales Channels -> Online Store -> Custom Pages -> Terms & Conditions
- Click Code Mode
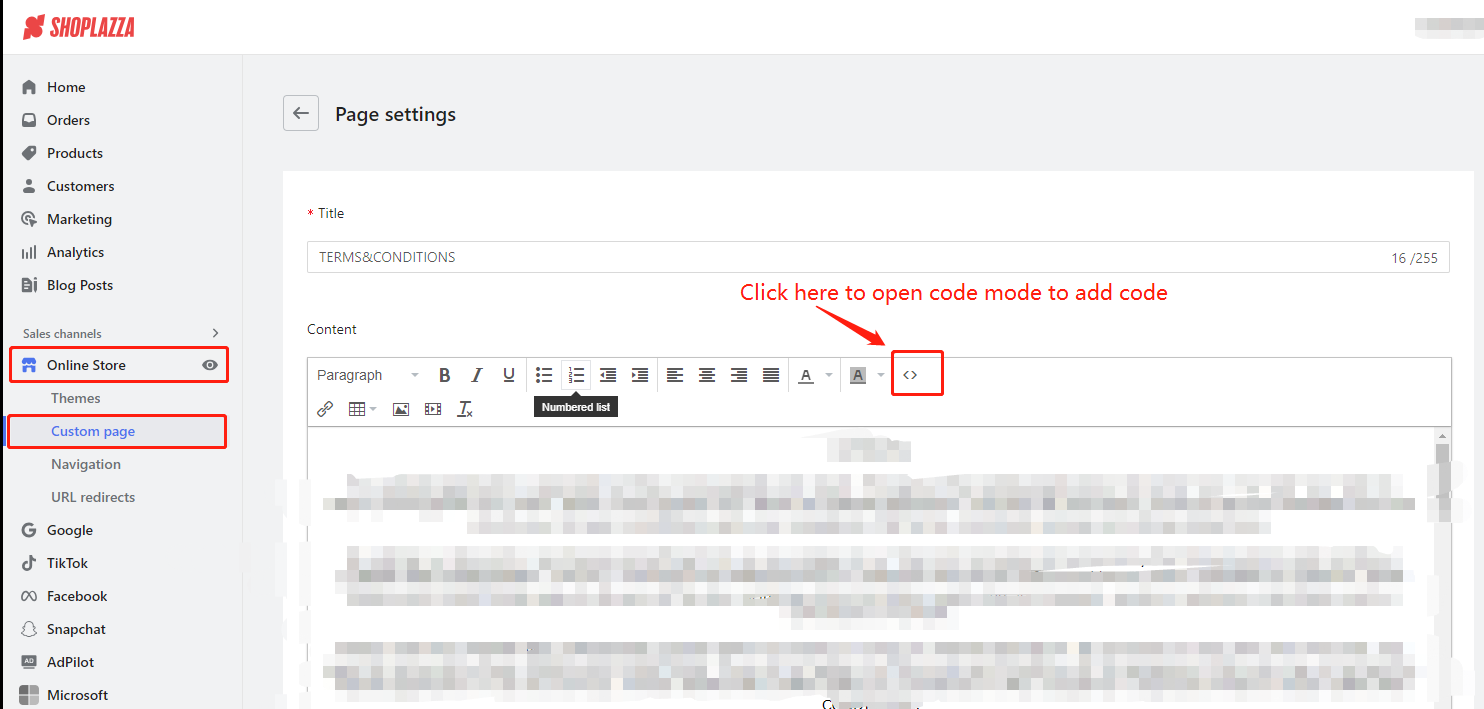
- In Code Mode, add the main body code provided by Oceanpayment at the bottom.
- Click Confirm and Save Changes
3 Intellectual Property Rights
3.1 Add Intellectual Property Code
This code is primarily used to display the contact information of our company's IP mailbox, so that relevant brand parties can contact us.
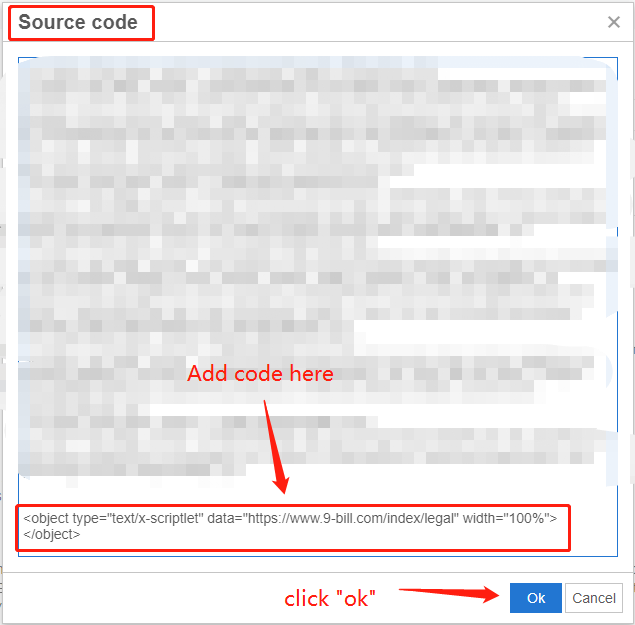
Merchants need to insert the following code at the bottom in the editor's code mode during page editing.
Intellectual Property Code:
Add a clause link with an image:
<img src="https://www.9-bill.com/index/legal">Or a text clause link:
<object type="text/x-scriptlet" data="https://www.9-bill.com/index/legal" width="100%"></object>(Choose one of the links, the specific type of link to be added should be based on the website modification advice document provided by Oceanpayment.)
Addition Steps:
- Log in to the Shoplazza backend -> Sales Channels -> Online Store -> Custom Pages -> Intellectual Property Rights
- Click on Code Mode
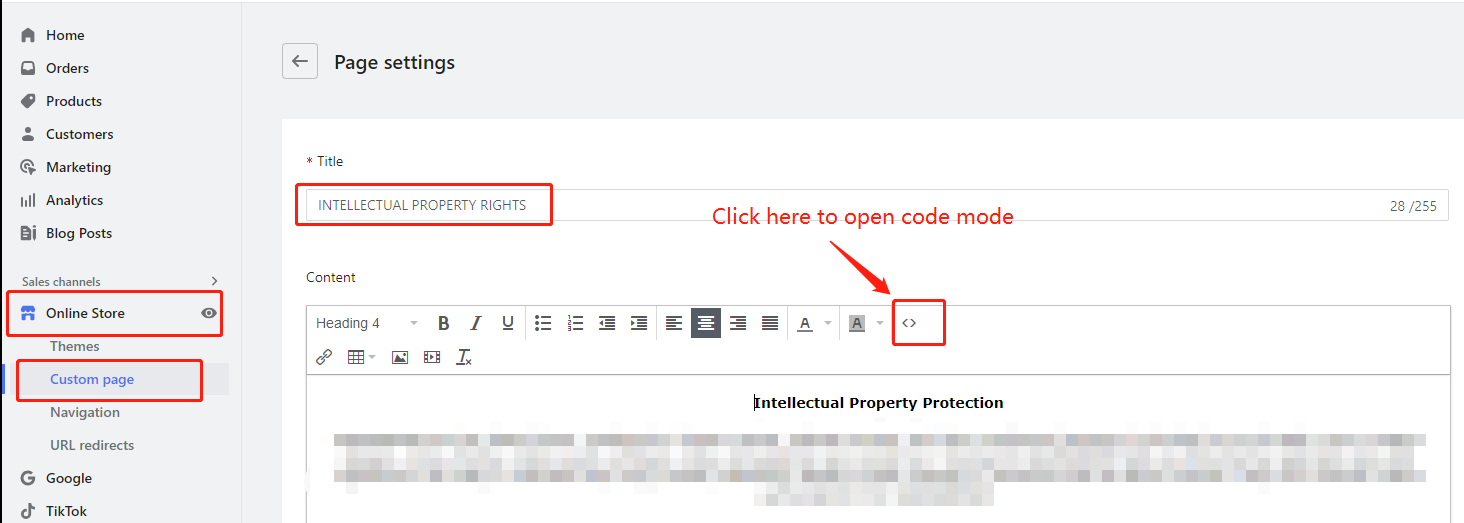
- In the code mode, add the intellectual property code provided by Oceanpayment at the bottom.
- Click ok to save the changes